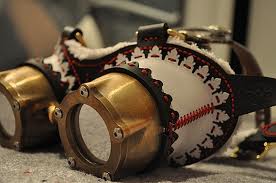
There is an art to steampunk goggles but once you get an idea of where to start in making them, let alone imagining them, you should be able to create a pair fairly easily.

The idea is to combine metals, preferably bronze or silver, and leather. If you have an old leather bag you no longer use you can either take a strip from it to make the strap or modify a loose handle that incorporates a buckle. If you don't have any leather about, don't buy any new leather but rather search out old beaten up leather in a second hand store. The softer the leather the better. When making holes for the buckles you can use a nail punch and a hammer or mallet. Alternatively there are fabric or leather punches that you can use. As for the buckles, buy an old buckle and fold the leather over the right side. You can stitch the leather with strong sharp needle and thick thread (may require some strength) or you can join the leather using fold-back pins (you will need to make a small cut to push the pin through) that are covered with material on the inside to stop them from scratching you.

Alternatively you can make spyglasses and hang them on a strap around your neck so that you only need to locate a leather strap, some swimming goggles or a pair of protective glasses metalworkers or woodworkers tend to wear. Just head to a hardware and you'll find a cheap pair. Then add knobs and nodules, the ends of small cans and some spay paint, layered if you like (as above). A strong glue is a necessity.

And if that search proves impossible then choosing a strap that's made from brown or black elastic is best. If choosing black then match the colour of the goggles to the strap by including black. The dominant colours of the steampunk version of the Victorian era are red, brown, bronze, gold, silver and black. Metal is preferred over plastic but we all make do. If you don't want to work with metal then spray painting and lacquering a metal paint on might be an easy option.
Eye glasses can become more feminine if you add smaller, more intricate patterns rather than chunky techy type knobs, lenses and gadgets. While any pair of steampunk glasses would suit there are occasions when a more feminine pair is in order, such as when matching the goggles to a Victorian-style steampunk dress rather than pants and a shirt.

For a more futuristic or space-adventure orientated goggles it might be nice to start with ski goggles, possibly tinted. Not all steampunk stories are based on Earth or even during the Victorian era. In such cases it is all about Victorian technology being in use or being the basis for the current technology. As such, modifications like the above are perfectly acceptable.

Going this far may shock those seeing it for the first time though. The space based steampunk goggles here do tend to blend seamlessly with French horror (often romantic in some way) stories and cyborg stories. I quite like these for a steampunk villain's goggles.

Speaking of steampunk villains, here is one to rival Darth's helmet. This can be made using either a modified gas mask or a modified diving mask and top. Add piping, bronze bathroom or piping attachments as well as bronze goggles and you should be able to make a fairly intimidating version of this type of steampunk face mask.

To find those little pieces that make you goggles have a clockwork feel you can scour through second hand stores for analogue clocks or a hardware for parts. Then just attach them in an arrangement in a manner that seems to make sense. You can use wing-nut screws for their unique look, glue for a seamless look or small sized ordinary screws for practicality. If your goggles are to be black then painting them and then scratching or sanding back the paint for a weathered metal look might be nice.

The pieces you want to add may need to be bent to shape. In which case you can do this the old way, placing the piece against something strong with a shape similar to what you want, covering the piece with material and gently tapping it into shape with a small hammer. The more fragile the piece the gentler you need to tap. If you're a little worried you'll break it then obtaining a couple of them beforehand allows you to try and fail until you get the hang of it.

As to the lenses, you can find cut glass of the right size as coasters (although these might be hard to see through), as lenses in old glasses that can be popped out, candle plates, glass paperweights etc. As long as you can see through them clearly and they are the right size for slotting into the goggles, which could be made using cut tin cans or the rims of jar lids, then you can use them. You just need to be sure you've attached them properly by not only making sure they won't pop out but also pop back in. To stop them popping in just glue a strip of plastic or leather to the inside of the goggle.

To add the extra lenses you can use small magnifying lenses. You are unlikely to actually use these so the magnification shouldn't be an issue. Speaking of magnification, if you usually wear glasses you can pop the lenses out of an old pair (most of you will have updated you lenses at some point due to wear more than a change in your vision) and slot these in place behind the lenses or as the lenses. If you're doing this then make sure the lenses don't sit too far from your eyes. Bifocal lenses aren't an issue as most steampunk goggles just become more impressive the more intricate they are.
Good to see these helpful information here, Thanks lots for sharing them with us.
ReplyDeletesteampunk glasses
led party accessories